|
This tutorial expands material provided in the documentation with practical step by step examples on how to set up your own user-defined brushes. Making your own Multi-Channel Brush Textures You can use any technique to paint / fabricate your own brush stroke textures. One important thing to understand is how to get the most texture detail out of a supplied custom brush. So first let?s create a brush and see how it goes.
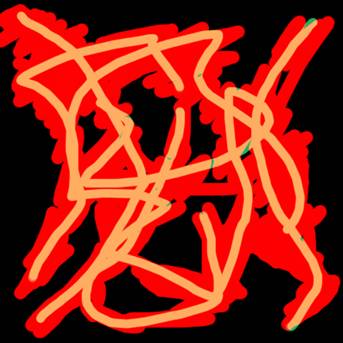
Figure 1. Above we have a user defined brush. Remember when using the red-green mode of a user-defined brush, that the red channel is used to paint a first pass of the brush using a color sampled from the original image.? Then that color has some noise added to the color's hue, saturation and value . The green channel is used as a matte to paint this perturbed color over the first pass that used the red channel as a matte. Note as well we attempted not to cover the frame edge. Basically when painting, we anchor that image onto the stroke on and in Video Gogh the height ('y', vertical axis) of this image correspond to the stroke length, meaning the stroke brush texture starts at the bottom and is applied over the length of the stroke until the end of this texture. We remind you of this as some of the brush textures you can find on the internet are not designed this way in that they don't have a nice falloff on the frame edge.
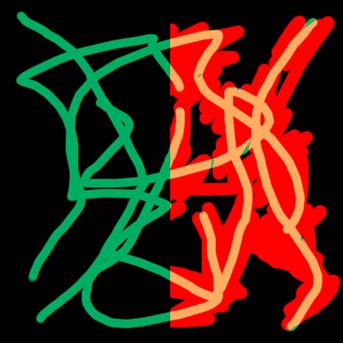
Figure 2. On the left side of we show the green channel by itself. A reminder: When creating your custom brushes make sure you start with a complete transparent canvas so that the custom brushes have a proper alpha channel. What you see as black here is actually transparent. Now let's use the image above as a custom brush for Video Gogh
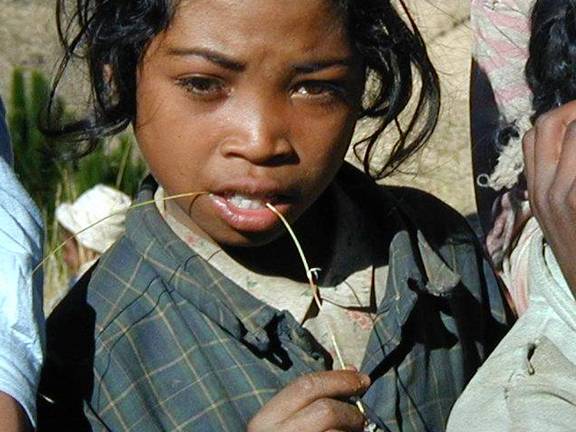
Figure 3. Above is our source image to be painted.
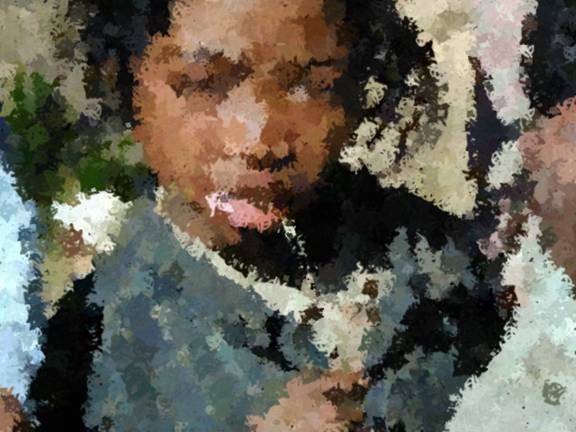
Figure 4. Above is our first test with the custom brush texture. It has the sort of roughness we were looking for but the texturing itself is perhaps not as detailed as we would like.
Figure 5. So in the picture above we increase the levels of the green channel levels so the green channel brush has a maximum value near white and not grey. During the second pass of painting the brush stroke, farther away that a green channel pixel is not full on, the more it is painted transparently. Remember for that second pass the green channel acts as a multiplier of opacity. In addition, of the green channel is used as a matte to paint a second pass of the brush with color noise variation to provide color variation from the first pass that used the red channel. It's slightly better but there is still not enough detail for us.
Figure 6. In the picture above we show a good way to understand what is happening. We temporarily set the "Extra Distance" parameter to a value high enough so you see the brush strokes separated, here 0.1 will do. In order to see how the design of the brush affects the texture detail in the painting, it is useful to view the custom brush at the size it is being painted... in this case, about 32 pixels square.
Figure 7. In the image above were we scale the custom brush we made to 32x32, and of course the yellow in it is hardly even visible by itself.
Figure 8. In order to get more detail in the second pass of brush application (using the green channel) what we do is add more yellow (make it thicker in the green channel)
Figure 9. And above is the result using the brush of Figure 8. Our strokes are much more textured. So if you want to use existing textures and want to maintain texture details, you will probably need to process the source brush images so they have the proper level of detail at the rendered size you want to use them. Additional Notes Painting using your own sprite set. We also offer the option of stamping directly the brush texture. Much like we explained in previous tutorial, your sprite is subject to resolution and the image might need to be enhanced a bit before we start using it so it works at the wanted resolution. You can use up to 10 different brush stroke sequences. One thing to note is that while you need to create animated brush sequences that are as long as your rendered sequence, you can do this by create loops in your brush stroke animations.. For example it's possible to use our RE:Flex morphing tool to create 1 or 2 in-between frames to connect the first and last frame of a short sequence that you might have. How many different custom brushes do I really need? Since brushes receive orientation, can have growth and die based size, and have different colors (coming from the color source), we usually don't need many different brush textures, 4 or 5 is often more then enough, while in some cases one one might be perceptible. What aspect ratio? Square Pixels: Even if you are motion painting a sequence with non square pixel aspect ratio, consider making your strokes in a square pixels comp since brush orientation would break the logic of the aspect ratio. |