Find a Tutorial
 Autograph
 DEFlicker
 RE:Fill
 RE:Grade
 RE:Lens
 REZup
REZup


-
Post motion blur using RSMB motion vectors in Nuke from C4D
See TutorialDescription
Quick overview of how RSMB uses motion vectors in Nuke from a C4D motion vector pass.
Thanks to Impossible Engine for creating this tutorial.
This Tutorial Includes
- Video
-
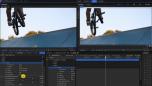
HitFilm: RSMB, Effects with two inputs
See TutorialDescription
This tutorial covers the basic use of RSMB and RSMB Pro with Vectors in HitFilm.Special thanks to Rickard Bengston for the BMX footage and Arkadiy Demchenko for the Motion Vector spider. http://www.sigillarium.com/blog/Author: Lori FreitagThis tutorial covers the basic use of RSMB and RSMB Pro with Vectors in HitFilm.
Special thanks to Oton Bacar for the BMX footage and Arkadiy Demchenko for the Motion Vector spider.This Tutorial Includes
- Video
-
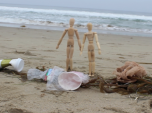
“Save our Beaches” – an example using multiple RE:Vision Effects plugins
See TutorialDescription
This video is a showcase of a short PSA created using RE:Match, DE:FLicker, ReelSmart Motion Blur and Twixtor that show real world example of problems solved such as: multiple shots that are automatically color matched, flicker removal, footage extended to match a needed duration, and motion blur added to remove stutter.A Special Thanks to:Mathias Omotola from http://www.maxon.net for helping me with the C4D title.Oton Bacar http://vimeo.com/user4329703 for the Twixtor Slomo bike footagePatrick Boivin https://www.youtube.com/user/PatrickBoivin for the Transformer, stop motion footageGrayson Hild http://www.graysonhild.com for the time-lapse pier and lifeguard tower time-lapse footage.Author: Lori FreitagCompany: RE:Vision Effectslink: http://revisionfx.com/products/This video is a showcase of a short PSA created using RE:Match, DEFlicker, ReelSmart Motion Blur and Twixtor that show real world example of problems solved such as: multiple shots that are automatically color matched, flicker removal, footage extended to match a needed duration, and motion blur added to remove stutter.
A Special Thanks to:
Mathias Omotola from http://www.maxon.net for helping me with the C4D title.
Oton Bacar http://vimeo.com/user4329703 for the Twixtor Slomo bike footage
Patrick Boivin https://www.youtube.com/user/PatrickBoivin for the Transformer, stop motion footage
Grayson Hild http://www.graysonhild.com for the time-lapse pier and lifeguard tower time-lapse footage.This Tutorial Includes
- Video
-
RE:Vision FX and Premiere: Frame Rate Conversion and Mixed Formats
See TutorialDescription
In this tutorial, you will see several examples demonstrating frame rate conversion and mixed format issues and their solutions.
Credits:
We would like to thank the following for providing footage:
Gordon Laing - 120fps footage
http://cameralabs.com
cameralabs.com/reviews/Sony_Cyber-shot_RX100_III/
Also, thanks to Tim Easton for modeling for footage with numbers.This Tutorial Includes
- Video
-
Using Reel Smart Motion Blur with modo 701 outputs in Nuke & After Effects
See TutorialDescription
the use of motion vectors which modo can output at render time.You can access the sample files including the Nuke and After Effects files here9bstudios.com/modo70x/CrazyChicken.zipA video covering the use of Reel Smart Motion Blur to add motion blur to your images in the post process via the use of motion vectors which modo can output at render time.You can access the sample files including the Nuke and After Effects files here 9bstudios.com/modo70x/CrazyChicken.zip
Special Thanks to Yazan Malkosh 9bstudios.com for providing us with this tutorial. The 3D renderer is Modo luxology.com
This Tutorial Includes
- Video
-
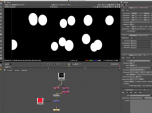
Exporting 3D Renders out of C4D for our plugins: Part 2 - More Passes
See TutorialDescription
This tutorial shows how how to set up a project in Cinema 4D to get the best results for use with RE:Map UV and RSMB Pro Vectors, Smoothkit ZBlur, RE:Fill and Shade Shape in After Effects (although you can use other host applications for compositing and some of this will apply to other plugins).Special Thanks to Patrick Goski at Maxon.net for creating & providing the C4D sample project and for his support 24/7.This tutorial shows how how to set up a project in Cinema 4D to get the best results for use with RE:Map UV and RSMB Pro Vectors, Smoothkit ZBlur, RE:Fill and Shade Shape in After Effects (although you can use other host applications for compositing and some of this will apply to other plugins).
Special Thanks to Patrick Goski at Maxon.net for creating & providing the C4D sample project and for his support 24/7.
This Tutorial Includes
- Video
-
RE:Vision Effects products with Cinema4D
See TutorialDescription
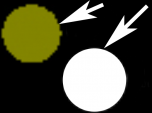
Assigning a Coverage Alpha Matte to the Control Source
Some of our products work from image data rendered from a 3D renderer. Here are notes about Motion Vectors but they apply as well to exporting surface normals or UV maps…
This Tutorial Includes
- Web Pages
-
Exporting 3d renders out of C4D for our plugins : Part 1 - Motion Vectors and UV Maps
See TutorialDescription
This tutorial shows how how to set up a project in Cinema 4D to get the best results for use with RE:Map UV and RSMB Pro Vectors in After Effects (although you can use other host applications for compositing and some of this will apply to other plugins). A Sample project is included using After Effects.Special Thanks to Patrick Goski at Maxon.net for creating & providing the C4D sample project and for his support 24/7.This tutorial shows how how to set up a project in Cinema 4D to get the best results for use with RE:Map UV and RSMB Pro Vectors in After Effects (although you can use other host applications for compositing and some of this will apply to other plugins). A Sample project is included using After Effects.
Special Thanks to Patrick Goski at Maxon.net for creating & providing the C4D sample project and for his support 24/7.This Tutorial Includes
- Video
- ZIP File
-
RSMB Vectors from C4D to AE
See TutorialDescription
In this tutorial you will learn how to utilise a motion vector pass from Cinema 4D to introduce motion blur in to your final comp, with RE: Vision Effects Reel Smart Motion Blur Vectors Plugin.
If Play link does not work, try this external link
This Tutorial Includes
- Video
-
RSMB for Maya users
See TutorialDescription
This is a four-part tutorial about adding motion blur to a Maya render by first creating a 2D motion vector sequence and then using it with ReelSmart Motion Blur in post production. I’ll be covering Maya 2009’s 2D motion vector pass as well as installation and use of the lm_2DMV shader for earlier Maya versions. Once this technique is part of your pipeline, it can be a tremendous time saver compared with creating (and waiting for) motion blur from within Maya. It also provides the flexibility of applying any amount of motion blur without having to re-render.
This Tutorial Includes
- Web Pages