Find a Tutorial
 ARRI Film Lab
 Autograph
 Color Genius
 DEFlicker
 RE:Fill
 RE:Grade
 RE:Lens
 REZup
REZup


-
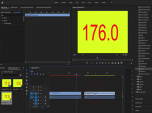
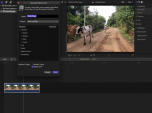
DEFlicker and Timelapse
See TutorialDescription
In this tutorial, you will see the workflow used to get rid of Flicker in a Sunset, Time-lapse video shot at a low frame rate with DEFlicker Time-lapse. Download footage here: https://vimeo.com/436250814/34a2feb04e
This Tutorial Includes
- Video
-
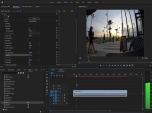
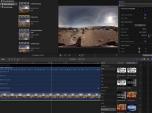
How to remove Rolling Bands with DEFlicker
See TutorialDescription
In this tutorial, you will learn the basic steps for using DEFlicker Rolling Bands in After Effects. You will see a few examples demonstrating different scenarios.06:56Effect here is the wagon-wheel effect - see these links tolearn more about wagon wheel effect:https://www.youtube.com/watch?v=VNftf5qLpiAhttps://www.youtube.com/watch?v=QOwzkND_ooUhttps://www.youtube.com/watch?v=6XwgbHjRo30https://www.youtube.com/watch?v=9MN5MF72PHsThank you to Anita Rizzano for the Rolling Bands footage.In this tutorial, you will learn the basic steps for using DEFlicker Rolling Bands in After Effects. You will see a few examples demonstrating different scenarios.
06:56See these links to learn more about wagon wheel effect:
https://www.youtube.com/watchv=VNftf5qLpiAhttps://www.youtube.com/watch?v=QOwzkND_ooU
https://www.youtube.com/watch?v=6XwgbHjRo30
https://www.youtube.com/watch?v=9MN5MF72PHs
Thank you to Anita Rizzano for the Rolling Bands footage.
This Tutorial Includes
- Video
-
Twixtor 7 in Premiere Pro and AE 2020-Review and Whats New-Part 2
See TutorialDescription
In this tutorial, you will see part 2 which picks up where part 1 leaves off, covering new features in Twixtor 7, running on Premiere Pro and AE 2020. You will want to watch part 1 first for the rest of the new features. You will want to download the latest version of Twixtor to follow along with this tutorial. Features covered in this tutorial:00:27 - InFPS = OutFPS.01:25 - Converting 25FPS to 23.976 FPS and keeping the audio in sync.03:13 - 360 Video checkbox03:22 - Twixtor Pro - RGB+AIn this tutorial, you will see part 2 which picks up where part 1 leaves off, covering new features in Twixtor 7, running on Premiere Pro and AE 2020. You will want to watch part 1 first for the rest of the new features. You will want to download the latest version of Twixtor to follow along with this tutorial. Features covered in this tutorial:
00:27 - InFPS = OutFPS.
01:25 - Converting 25FPS to 23.976 FPS and keeping the audio in sync.
03:13 - 360 Video checkbox
03:22 - Twixtor Pro - RGB+A
This Tutorial Includes
- Video
-
Twixtor 7 in Premiere Pro and AE 2020-Review and Whats New-Part 1
See TutorialDescription
In this tutorial, you will see part 1 which covers some of the new features in Twixtor 7, running on Premiere Pro and AE 2020. You will want to watch part 2 for the rest of the new features. You will want to download the latest version of Twixtor to follow along with this tutorial.Music: YouTube Audio LibraryAuthor: Lori FreitagCompany: RE:Vision Effectslink: http://revisionfx.com/products/Twixtor/In this tutorial, you will see part 1 which covers some of the new features in Twixtor 7, running on Premiere Pro and AE 2020. You will want to watch part 2 for the rest of the new features. You will want to download the latest version of Twixtor to follow along with this tutorial.
This Tutorial Includes
- Video
-
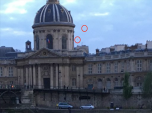
Dead pixel, Hot pixel, Stuck pixel removal with RE:Fill
See TutorialDescription
In this tutorial, you will see how to use RE:Fill Area Fill to get rid of Dead, Hot or Stuck pixels. This is just one use for RE:Fill Area Fill. You can check our documentation and other tutorials for other uses.In this tutorial, you will see how to use RE:Fill Area Fill to get rid of Dead, Hot or Stuck pixels. This is just one use for RE:Fill Area Fill. You can check our documentation and other tutorials for other uses.This Tutorial Includes
- Video
-
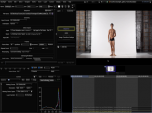
Twixtor in Baselight
See TutorialDescription
In this tutorial, you will see the basic steps to set up Twixtor in Baselight. Refer to the other Twixtor tutorials to see specifics on how to use all of the Twixtor settings.Other Twixtor tutorials: https://help.revisionfx.com/search/?p=64Music: YouTube Audio LibraryAuthor: Lori FreitagCompany: RE:Vision Effectslink: http://revisionfx.com/products/Twixtor/In this tutorial, you will see the basic steps to set up Twixtor in Baselight. Refer to the other Twixtor tutorials to see specifics on how to use all of the Twixtor settings.
Other Twixtor tutorials
Music: YouTube Audio LibraryThis Tutorial Includes
- Video
-
Saving Effects Presets in FCPX
See TutorialDescription
In this tutorial, you will learn the basics for saving effects presets in FCPX. For more detailed info:https://support.apple.com/kb/PH20831?locale=en_USIn this tutorial, you will learn the basics for saving effects presets in FCPX. For more detailed info:Effects PresetsThis Tutorial Includes
- Video
-
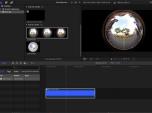
RE:Lens - Stabilizing 360 VR in FCPX tutorial
See TutorialDescription
In this tutorial, you will learn the basics of how to use the "Spherical Stabilization" feature within RE:Lens in FCP X.In this tutorial, you will learn the basics of how to use the "Spherical Stabilization" feature within RE:Lens in FCP X.
This Tutorial Includes
- Video
-
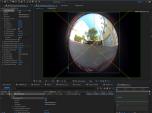
RE:Lens for FCPX - Converting fisheye footage to 360
See TutorialDescription
In this tutorial, we will use RE:Lens in FCP X to directly convert 280 degree fisheye footage, to latitude longitude panoramic format suitable for 360 video viewers.In this tutorial, we will use RE:Lens in FCP X to directly convert 280 degree fisheye footage, to latitude longitude panoramic format suitable for 360 video viewers.
This Tutorial Includes
- Video
-
RE:Lens - Shoot now, do the camera work later
See TutorialDescription
In this tutorial, we will use the RE:Lens Superfish plugin, to animate the camera in post and show two examples.camera used: Modified GoPro camera with the Entanyia fisheye lens by EntapanoIn this tutorial, we will use the RE:Lens Superfish and the From Latlong plugin, to animate the camera in post and show two examples.
camera used: Modified GoPro camera with the Entanyia fisheye lens by EntapanoThis Tutorial Includes
- Video