Find a Tutorial
 Autograph
 Color Genius
 DEFlicker
 RE:Fill
 RE:Grade
 RE:Lens
 REZup
REZup


-
Premiere Pro - Proxy Workflow Tips and Our Plug-Ins
See TutorialDescription
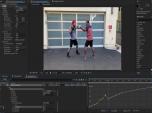
This is an example of another method besides using Render Effects, to have smooth editing with high resolution files. We use proxy mode with Twixtor so you can dynamically change the video speed with our tools without pre-rendering previews every time, while editing.**Note: One reason we use proxies here is that the footage is 4K and Twixtor is not a real-time effect in Premiere, so at 4K, you might have non-responsive playback even with GPU on.This is an example of another method besides using Render Effects, to have smooth editing with high resolution files. We use proxy mode with Twixtor so you can dynamically change the video speed with our tools without pre-rendering previews every time, while editing.
**Note: One reason we use proxies here is that the footage is 4K and Twixtor is not a real-time effect in Premiere, so at 4K, you might have non-responsive playback even with GPU on.This Tutorial Includes
- Video
-
Twixtor, Time Remapping and Excel
See TutorialDescription
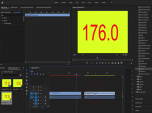
In this tutorial, you will see two different methods used to remap time, as well as a shortcut using an Excel spreadsheet. We also see a frame rate conversion.In this tutorial, you will see two different methods used to remap time, as well as a shortcut using an Excel spreadsheet. We also see a frame rate conversion.This Tutorial Includes
- Video
-
Twixtor 7 in Premiere Pro and AE 2020-Review and Whats New-Part 2
See TutorialDescription
In this tutorial, you will see part 2 which picks up where part 1 leaves off, covering new features in Twixtor 7, running on Premiere Pro and AE 2020. You will want to watch part 1 first for the rest of the new features. You will want to download the latest version of Twixtor to follow along with this tutorial. Features covered in this tutorial:00:27 - InFPS = OutFPS.01:25 - Converting 25FPS to 23.976 FPS and keeping the audio in sync.03:13 - 360 Video checkbox03:22 - Twixtor Pro - RGB+AIn this tutorial, you will see part 2 which picks up where part 1 leaves off, covering new features in Twixtor 7, running on Premiere Pro and AE 2020. You will want to watch part 1 first for the rest of the new features. You will want to download the latest version of Twixtor to follow along with this tutorial. Features covered in this tutorial:
00:27 - InFPS = OutFPS.
01:25 - Converting 25FPS to 23.976 FPS and keeping the audio in sync.
03:13 - 360 Video checkbox
03:22 - Twixtor Pro - RGB+A
This Tutorial Includes
- Video
-
Twixtor 7 in Premiere Pro and AE 2020-Review and Whats New-Part 1
See TutorialDescription
In this tutorial, you will see part 1 which covers some of the new features in Twixtor 7, running on Premiere Pro and AE 2020. You will want to watch part 2 for the rest of the new features. You will want to download the latest version of Twixtor to follow along with this tutorial.Music: YouTube Audio LibraryAuthor: Lori FreitagCompany: RE:Vision Effectslink: http://revisionfx.com/products/Twixtor/In this tutorial, you will see part 1 which covers some of the new features in Twixtor 7, running on Premiere Pro and AE 2020. You will want to watch part 2 for the rest of the new features. You will want to download the latest version of Twixtor to follow along with this tutorial.
This Tutorial Includes
- Video
-
Premiere Pro to After Effects Workflow
See TutorialDescription
In this tutorial, we will see three examples showing the workflow from Premiere Pro to After Effects using Dynamic link. Examples include use of Twixtor, RE:Match and RE:Lens plugins.In this tutorial, we will see three examples showing the workflow from Premiere Pro to After Effects using Dynamic link. Examples include use of Twixtor, RE:Match and RE:Lens plugins.
This Tutorial Includes
- Video
-
Using 360 Video as a second camera
See TutorialDescription
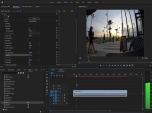
In this Overview, we discuss using a 360 camera rig as second video camera to cut to. In this project we met different challenges and see how we solved them provided using RE:Vision Effects plug-ins.Camera used:GoPro Omni 360, GoPro Karma droneSoftware used: Stitching done in GoPro Kolor (Autopano), RE:Lens From LatLong (for 360 source), RE:Lens DeFish to flatten the drone movie, Twixtor to time synch the drone movie.Special Thanks to credit Camera tech: Andrew GanzonIn this Overview, we discuss using a 360 camera rig as second video camera to cut to. In this project we met different challenges and see how we solved them provided using RE:Vision Effects plug-ins.
Camera used:GoPro Omni 360, GoPro Karma droneSoftware used: Stitching done in GoPro Kolor (Autopano), RE:Lens From LatLong (for 360 source), RE:Lens DeFish to flatten the drone movie, Twixtor to time synch the drone movie.
Camera tech: Andrew Ganzon
This Tutorial Includes
- Video
-
“Save our Beaches” – an example using multiple RE:Vision Effects plugins
See TutorialDescription
This video is a showcase of a short PSA created using RE:Match, DE:FLicker, ReelSmart Motion Blur and Twixtor that show real world example of problems solved such as: multiple shots that are automatically color matched, flicker removal, footage extended to match a needed duration, and motion blur added to remove stutter.A Special Thanks to:Mathias Omotola from http://www.maxon.net for helping me with the C4D title.Oton Bacar http://vimeo.com/user4329703 for the Twixtor Slomo bike footagePatrick Boivin https://www.youtube.com/user/PatrickBoivin for the Transformer, stop motion footageGrayson Hild http://www.graysonhild.com for the time-lapse pier and lifeguard tower time-lapse footage.Author: Lori FreitagCompany: RE:Vision Effectslink: http://revisionfx.com/products/This video is a showcase of a short PSA created using RE:Match, DEFlicker, ReelSmart Motion Blur and Twixtor that show real world example of problems solved such as: multiple shots that are automatically color matched, flicker removal, footage extended to match a needed duration, and motion blur added to remove stutter.
A Special Thanks to:
Mathias Omotola from http://www.maxon.net for helping me with the C4D title.
Oton Bacar http://vimeo.com/user4329703 for the Twixtor Slomo bike footage
Patrick Boivin https://www.youtube.com/user/PatrickBoivin for the Transformer, stop motion footage
Grayson Hild http://www.graysonhild.com for the time-lapse pier and lifeguard tower time-lapse footage.This Tutorial Includes
- Video
-
RE:Vision FX and Premiere: Frame Rate Conversion and Mixed Formats
See TutorialDescription
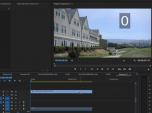
In this tutorial, you will see several examples demonstrating frame rate conversion and mixed format issues and their solutions.
Credits:
We would like to thank the following for providing footage:
Gordon Laing - 120fps footage
http://cameralabs.com
cameralabs.com/reviews/Sony_Cyber-shot_RX100_III/
Also, thanks to Tim Easton for modeling for footage with numbers.This Tutorial Includes
- Video
-
Frame Rate Conversions in Twixtor within Premiere Pro (done in CS5)
See TutorialDescription
This tutorial shows how how to do a Frame rate conversion if the Input and the Output are both Progressive.Special Thanks to Banditos Brothers for providing footage - www.banditobrothers.comAlso, special thanks to Rickard Bengtsson for allowing us to use his water balloon footage www.vimeo.com/rbengtsson.This tutorial shows how how to do a Frame rate conversion if the Input and the Output are both Progressive.
Special Thanks to Banditos Brothers for providing footage. www.banditobrothers.comSpecial Thanks to Rickard Bengtsson for allowing us to use his water balloon footage. www.vimeo.com/rbengtsson.
This Tutorial Includes
- Video
-
Twixtor: When and How to use Tracking Points
See TutorialDescription
This Tutorial shows how to get better results using Tracking Points for more complex shots and to help get rid of warping or ghosting. Tracking Points are available in Twixtor Pro for AE, FCP (pre-FCPX), Premiere Pro, Nuke & OFX hosts such as Scratch & Composite.
This Tutorial Includes
- Video