Find a Tutorial
 Autograph
 Color Genius
 DEFlicker
 RE:Fill
 RE:Grade
 RE:Lens
 REZup
REZup


-
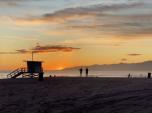
DEFlicker and Timelapse
See TutorialDescription
In this tutorial, you will see the workflow used to get rid of Flicker in a Sunset, Time-lapse video shot at a low frame rate with DEFlicker Time-lapse. Download footage here: https://vimeo.com/436250814/34a2feb04e
This Tutorial Includes
- Video
-
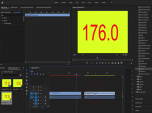
Twixtor 7 in Premiere Pro and AE 2020-Review and Whats New-Part 2
See TutorialDescription
In this tutorial, you will see part 2 which picks up where part 1 leaves off, covering new features in Twixtor 7, running on Premiere Pro and AE 2020. You will want to watch part 1 first for the rest of the new features. You will want to download the latest version of Twixtor to follow along with this tutorial. Features covered in this tutorial:00:27 - InFPS = OutFPS.01:25 - Converting 25FPS to 23.976 FPS and keeping the audio in sync.03:13 - 360 Video checkbox03:22 - Twixtor Pro - RGB+AIn this tutorial, you will see part 2 which picks up where part 1 leaves off, covering new features in Twixtor 7, running on Premiere Pro and AE 2020. You will want to watch part 1 first for the rest of the new features. You will want to download the latest version of Twixtor to follow along with this tutorial. Features covered in this tutorial:
00:27 - InFPS = OutFPS.
01:25 - Converting 25FPS to 23.976 FPS and keeping the audio in sync.
03:13 - 360 Video checkbox
03:22 - Twixtor Pro - RGB+A
This Tutorial Includes
- Video
-
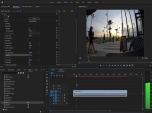
Twixtor 7 in Premiere Pro and AE 2020-Review and Whats New-Part 1
See TutorialDescription
In this tutorial, you will see part 1 which covers some of the new features in Twixtor 7, running on Premiere Pro and AE 2020. You will want to watch part 2 for the rest of the new features. You will want to download the latest version of Twixtor to follow along with this tutorial.Music: YouTube Audio LibraryAuthor: Lori FreitagCompany: RE:Vision Effectslink: http://revisionfx.com/products/Twixtor/In this tutorial, you will see part 1 which covers some of the new features in Twixtor 7, running on Premiere Pro and AE 2020. You will want to watch part 2 for the rest of the new features. You will want to download the latest version of Twixtor to follow along with this tutorial.
This Tutorial Includes
- Video
-
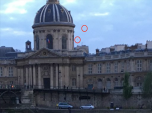
Dead pixel, Hot pixel, Stuck pixel removal with RE:Fill
See TutorialDescription
In this tutorial, you will see how to use RE:Fill Area Fill to get rid of Dead, Hot or Stuck pixels. This is just one use for RE:Fill Area Fill. You can check our documentation and other tutorials for other uses.In this tutorial, you will see how to use RE:Fill Area Fill to get rid of Dead, Hot or Stuck pixels. This is just one use for RE:Fill Area Fill. You can check our documentation and other tutorials for other uses.This Tutorial Includes
- Video
-
RE:Lens - Shoot now, do the camera work later
See TutorialDescription
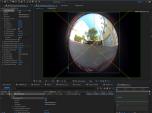
In this tutorial, we will use the RE:Lens Superfish plugin, to animate the camera in post and show two examples.camera used: Modified GoPro camera with the Entanyia fisheye lens by EntapanoIn this tutorial, we will use the RE:Lens Superfish and the From Latlong plugin, to animate the camera in post and show two examples.
camera used: Modified GoPro camera with the Entanyia fisheye lens by EntapanoThis Tutorial Includes
- Video
-
RE:Flex for AE - Moving Morph using per-spline blending and warping controls
See TutorialDescription
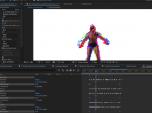
This screencast takes the Moving Morph a step further, explaining how to vary the splines dissolve rates and also how to use the Control Image to fine tune your results.Special Thanks to credit Amy Seiwert's Imagery ( http://www.asimagery.org ) for providing footage for this tutorial.This screencast takes the Moving Morph a step further, explaining how to vary the splines dissolve rates and also how to use the Control Image to fine tune your results.
Special Thanks to credit Amy Seiwert's Imagery ( http://www.asimagery.org ) for providing footage for this tutorial.This Tutorial Includes
- Video
-
RE:Lens Defish and Superfish
See TutorialDescription
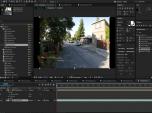
In this tutorial, you will see several examples where you will see different kinds of lens and which RE:Lens tool to use for what purpose.
Cameras and lenses used:
Ex. 1) - (00:15) Wide-angle lens used on GH4: Panasonic 7-14mm f/4
Beating the edge of frame over-stretching with Defish
Ex. 2) - (01:29) Anamorphic Lens used on GH 4: SLR Magic Anamorphic-Cine 2X 50mm T2.8 MFT
Non-Square Pixel Aspect Ratio, Anamorphic process
Ex. 2.A) - GoPro Hero 4 Black Superview Mode
Ex. 3) - (06:05) Full Frame Fisheye project-Lens used: Panasonic Lumix 8mm fisheye on GH4
Full Frame Fisheye and RE:Lens Defish
Ex. 4) - (07:06) Circular Fisheye - Lens: Sigma 4.5mm f 2.8 DC HSM Fisheye for Canon
Circular Fisheye lenses and RE:Lens Superfish
Ex. 4.A) - With Kipon Adapter
Ex. 4.B) - With Metabones Adapter
Ex. 5) - (11:10) Super Fisheye Lenses - Lens: Superfish lens by Entanya Entapano 280deg. on Back-Bone Ribcage
- Superfish Lenses
This Tutorial Includes
- Video
-
Uploading 360 Video to YouTube, Facebook and other players
See TutorialDescription
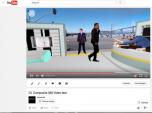
In this tutorial, you will learn how to upload 360º Video to YouTube and Facebook. Go to this url for step-by-step instructions..https://support.google.com/youtube/answer/6178631?hl=enhttp://www.revisionfx.com/products/relens/In this tutorial, you will learn how to upload 360º Video to YouTube and Facebook. Go to this url for step-by-step instructions..https://support.google.com/youtube/answer/6178631?hl=en
Also, how to export your 360 video with proper metadata, directly from Premiere Pro and After Effects.
This Tutorial Includes
- Video
-
DEFlicker Exploring Features
See TutorialDescription
In this tutorial, we explore some of the advanced features of DE:Flicker and show examples of special case scenarios and how to use these advanced features to get better results.Special Thanks to: VideoBlocks.com for providing the hotel time-lapse footage and Christmas tree footage used in this tutorial.Special Thanks to: Dan Lantz,Temple University for providing the Lobby footage and to Anthony Magliocco for the Soccer footage.In this tutorial, we explore some of the advanced features of DEFlicker and show examples of special case scenarios and how to use these advanced features to get better results.
Special Thanks to: VideoBlocks.com for providing the hotel time-lapse footage and Christmas tree footage used in this tutorial.
Special Thanks to: Dan Lantz,Temple University for providing the Lobby footage and to Anthony Magliocco for the Soccer footage.This Tutorial Includes
- Video
-
Our tools with Mocha - Guest appearance by Mask Avenger
See TutorialDescription
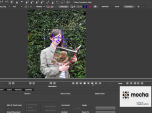
In this tutorial, we show how to integrate Mocha tools with our plugins since many of our tools support mattes, points, and masks from other software, we will see examples of this integration using Mocha to export mattes, masks, corner pin, stabilization and transform data.credits: picture set used here is of "Madison" (daughter of william @ illuminessence.co.uk)In this tutorial, we show how to integrate Mocha tools with our plugins since many of our tools support mattes, points, and masks from other software, we will see examples of this integration using Mocha to export mattes, masks, corner pin, stabilization and transform data.
01:11 Import Shape - example uses PV Feather
02:45 Open Shapes with Mask Avenger - example uses SmoothKit Directional With Splines
06:56 Import Corner Pin and Stabilization transform - into RE:Map Planar / Corner Pin (using expressions)
10:30 Import Matte - clean with RE:Fill
Credits: picture set used here is of "Madison" (daughter of william @ illuminessence.co.uk)
This Tutorial Includes
- Video