Find a Tutorial
 RE:Lens
 ARRI Film Lab
 Autograph
 Color Genius
 DEFlicker
 RE:Fill
 RE:Grade
 REZup
REZup


-
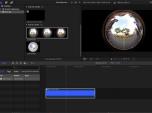
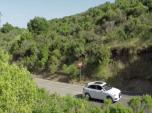
RE:Lens for FCPX - Converting fisheye footage to 360
See TutorialDescription
In this tutorial, we will use RE:Lens in FCP X to directly convert 280 degree fisheye footage, to latitude longitude panoramic format suitable for 360 video viewers.In this tutorial, we will use RE:Lens in FCP X to directly convert 280 degree fisheye footage, to latitude longitude panoramic format suitable for 360 video viewers.
This Tutorial Includes
- Video
-
RE:Lens - Shoot now, do the camera work later
See TutorialDescription
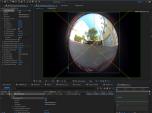
In this tutorial, we will use the RE:Lens Superfish plugin, to animate the camera in post and show two examples.camera used: Modified GoPro camera with the Entanyia fisheye lens by EntapanoIn this tutorial, we will use the RE:Lens Superfish and the From Latlong plugin, to animate the camera in post and show two examples.
camera used: Modified GoPro camera with the Entanyia fisheye lens by EntapanoThis Tutorial Includes
- Video
-
RE:Lens in Scratch - Part 2
See TutorialDescription
In this tutorial, we will use the RE:Lens plugin, in Scratch by ASSIMILATE and see how to stabilize footage in post on Super fisheye footage with the Spherical Stabilizer.Author: Lori FreitagCompany: RE:Vision Effectslink: http://revisionfx.com/products/RELens/In this tutorial, we will use the RE:Lens plugin, in Scratch by ASSIMILATE and see how to stabilize footage in post on Super fisheye footage with the Spherical Stabilizer.This Tutorial Includes
- Video
-
RE:Lens in Scratch - Part 1
See TutorialDescription
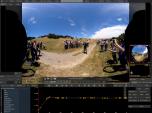
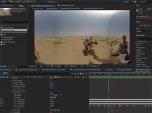
RE:Lens:RE:Lens in Scratch - Part 1Product: RE:LensHost used for tutorial: ScratchDescription:In this tutorial, we will use the RE:Lens plugin, in Scratch by assimilate and see how to animate a camera move in post on Super fisheye footage.Author: Lori FreitagCompany: RE:Vision Effectslink: http://revisionfx.com/products/RELensIn this tutorial, we will use RE:Lens in Scratch by ASSIMILATE and see how to animate a camera move in post on fisheye footage sources. The source material was shot with Panasonic GH5 in Photo6K mode using Entapano 250 deg. superfish lens. The host used here is Scratch as it supports mp4 video files over 4K which is what the GH5 records in that 18 MP recording mode.
*Note at 06:21, I said "horizontally" but I meant "vertically".
This Tutorial Includes
- Video
-
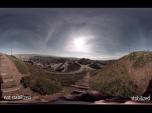
Using 360 Video as a second camera
See TutorialDescription
In this Overview, we discuss using a 360 camera rig as second video camera to cut to. In this project we met different challenges and see how we solved them provided using RE:Vision Effects plug-ins.Camera used:GoPro Omni 360, GoPro Karma droneSoftware used: Stitching done in GoPro Kolor (Autopano), RE:Lens From LatLong (for 360 source), RE:Lens DeFish to flatten the drone movie, Twixtor to time synch the drone movie.Special Thanks to credit Camera tech: Andrew GanzonIn this Overview, we discuss using a 360 camera rig as second video camera to cut to. In this project we met different challenges and see how we solved them provided using RE:Vision Effects plug-ins.
Camera used:GoPro Omni 360, GoPro Karma droneSoftware used: Stitching done in GoPro Kolor (Autopano), RE:Lens From LatLong (for 360 source), RE:Lens DeFish to flatten the drone movie, Twixtor to time synch the drone movie.
Camera tech: Andrew Ganzon
This Tutorial Includes
- Video
-
Setting up our plug-ins in Scratch when input and output resolution are different
See TutorialDescription
In this tutorial, you will learn the basic steps needed to use RE:Lens in Scratch by assimilate when the input and output have different resolutions.In this tutorial, you will learn the basic steps needed to use RE:Lens in Scratch by assimilate when the input and output have different resolutions.This Tutorial Includes
- Video
-
RE:Lens - Advanced Stabilization Tips
See TutorialDescription
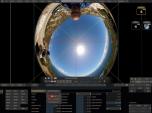
In this tutorial, you will see some advanced tips and tricks for using the Spherical Stabilizer within RE:Lens ToLatLong.Special thanks to Kevin Cruz & KODAK PIXPRO for the use of the Camel footageIn this tutorial, you will see some advanced tips and tricks for using the Spherical Stabilizer within RE:Lens ToLatLong.
Special thanks to Kevin Cruz & KODAK PIXPRO for the use of the Camel footageThis Tutorial Includes
- Video
-
RE:Lens Project Example - Tips and Tricks
See TutorialDescription
In this tutorial, you will see the workflow of a RE:Lens project utilizing Superfish and the "Spherical Stabilization" feature.Special thanks to JK Imaging Ltd. for the use of the Camel footage.In this tutorial, you will see the workflow of a RE:Lens project utilizing Superfish and the "Spherical Stabilization" feature.
Special thanks to JK Imaging Ltd. for the use of the Camel footage.This Tutorial Includes
- Video
-
RE:Lens - Stabilizing 360 VR footage
See TutorialDescription
In this tutorial, you will learn the basics of how to use the "Spherical Stabilization" feature within RE:Lens Superfish, ToLatLong and FromLatLong.In this tutorial, you will learn the basics of how to use the "Spherical Stabilization" feature within RE:Lens Superfish, ToLatLong and FromLatLong.
This Tutorial Includes
- Video
-
Tracking, Fisheye lenses and RE:Lens
See TutorialDescription
Description:In this tutorial, you will see a workflow example of tracking a flat graphic to footage that was shot using a Full Frame Fisheye Lens. Lens used: Panasonic Lumix 8mm fisheye on GH4 Full Frame Fisheye and RE:Lens DEFishAuthor: Lori FreitagCompany: RE:Vision Effectslink: http://revisionfx.com/products/RELens/Description:In this tutorial, you will see a workflow example of tracking a flat graphic to footage that was shot using a Full Frame Fisheye Lens. Lens used: Panasonic Lumix 8mm fisheye on GH4 Full Frame Fisheye and RE:Lens DEFish
This Tutorial Includes
- Video