Find a Tutorial
 Autograph
 Color Genius
 DEFlicker
 RE:Fill
 RE:Grade
 RE:Lens
 REZup
REZup


-
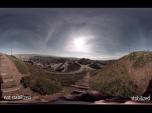
RE:Lens - Stabilizing 360 VR footage
See TutorialDescription
In this tutorial, you will learn the basics of how to use the "Spherical Stabilization" feature within RE:Lens Superfish, ToLatLong and FromLatLong.In this tutorial, you will learn the basics of how to use the "Spherical Stabilization" feature within RE:Lens Superfish, ToLatLong and FromLatLong.
This Tutorial Includes
- Video
-
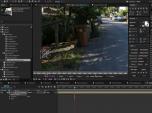
Tracking, Fisheye lenses and RE:Lens
See TutorialDescription
Description:In this tutorial, you will see a workflow example of tracking a flat graphic to footage that was shot using a Full Frame Fisheye Lens. Lens used: Panasonic Lumix 8mm fisheye on GH4 Full Frame Fisheye and RE:Lens DEFishAuthor: Lori FreitagCompany: RE:Vision Effectslink: http://revisionfx.com/products/RELens/Description:In this tutorial, you will see a workflow example of tracking a flat graphic to footage that was shot using a Full Frame Fisheye Lens. Lens used: Panasonic Lumix 8mm fisheye on GH4 Full Frame Fisheye and RE:Lens DEFish
This Tutorial Includes
- Video
-
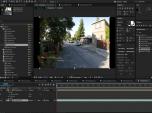
RE:Lens Defish and Superfish
See TutorialDescription
In this tutorial, you will see several examples where you will see different kinds of lens and which RE:Lens tool to use for what purpose.
Cameras and lenses used:
Ex. 1) - (00:15) Wide-angle lens used on GH4: Panasonic 7-14mm f/4
Beating the edge of frame over-stretching with Defish
Ex. 2) - (01:29) Anamorphic Lens used on GH 4: SLR Magic Anamorphic-Cine 2X 50mm T2.8 MFT
Non-Square Pixel Aspect Ratio, Anamorphic process
Ex. 2.A) - GoPro Hero 4 Black Superview Mode
Ex. 3) - (06:05) Full Frame Fisheye project-Lens used: Panasonic Lumix 8mm fisheye on GH4
Full Frame Fisheye and RE:Lens Defish
Ex. 4) - (07:06) Circular Fisheye - Lens: Sigma 4.5mm f 2.8 DC HSM Fisheye for Canon
Circular Fisheye lenses and RE:Lens Superfish
Ex. 4.A) - With Kipon Adapter
Ex. 4.B) - With Metabones Adapter
Ex. 5) - (11:10) Super Fisheye Lenses - Lens: Superfish lens by Entanya Entapano 280deg. on Back-Bone Ribcage
- Superfish Lenses
This Tutorial Includes
- Video
-
Export UV maps out of 3DS Max or Maya using Mental Ray or V-Ray
See TutorialDescription
This document outlines how to generate UV maps out of 3DS Max and Maya using Mental RAY (MR) and VRAY with reference renders and reference scenes and screenshots showing the settings. The intent is then use RE:Map UV or RE:Map Inverse UV in your compositing program.
We would like to thank Chad Capeland (https://indicated.co/) for helping us to document this process and testing the best approaches.
Note if you use V-Ray in Cinema 4D for example, you might want to also check our video tutorial using Cinema 4D Renderer ( http://help.revisionfx.com/task/22/#/tutorial-150) ).
This Tutorial Includes
- Web Pages
- ZIP Files
-
Quick Tip - Setting Color Correction Window
See TutorialDescription
Description:This tutorial covers the best practices and tips for using DE:Flicker in Premiere Pro to get the best results. This complements our other tutorials about specific features of the product that work the same in all applicationsThis tutorial covers the best practices and tips for using DE:Flicker in Premiere Pro to get the best results. This complements our other tutorials about specific features of the product that work the same in all applications.Description:In this tutorial, you learn about the Window option for more precise color matching with RE:Match color. This complements our other tutorials about specific features of the product that work the same in all applications.
This tutorial covers the best practices and tips for using DE:Flicker in Premiere Pro to get the best results. This complements our other tutorials about specific features of the product that work the same in all applicationsIn this tutorial, you learn about the Window option for more precise color matching with RE:Match color. This complements our other tutorials about specific features of the product that work the same in all applications.This Tutorial Includes
- Video
-
Post motion blur using RSMB motion vectors in Nuke from C4D
See TutorialDescription
Quick overview of how RSMB uses motion vectors in Nuke from a C4D motion vector pass.
Thanks to Impossible Engine for creating this tutorial.
This Tutorial Includes
- Video
-
Using Reel Smart Motion Blur with modo 701 outputs in Nuke & After Effects
See TutorialDescription
the use of motion vectors which modo can output at render time.You can access the sample files including the Nuke and After Effects files here9bstudios.com/modo70x/CrazyChicken.zipA video covering the use of Reel Smart Motion Blur to add motion blur to your images in the post process via the use of motion vectors which modo can output at render time.You can access the sample files including the Nuke and After Effects files here 9bstudios.com/modo70x/CrazyChicken.zip
Special Thanks to Yazan Malkosh 9bstudios.com for providing us with this tutorial. The 3D renderer is Modo luxology.com
This Tutorial Includes
- Video
-
Exporting 3d renders out of C4D for our plugins : Part 1 - Motion Vectors and UV Maps
See TutorialDescription
This tutorial shows how how to set up a project in Cinema 4D to get the best results for use with RE:Map UV and RSMB Pro Vectors in After Effects (although you can use other host applications for compositing and some of this will apply to other plugins). A Sample project is included using After Effects.Special Thanks to Patrick Goski at Maxon.net for creating & providing the C4D sample project and for his support 24/7.This tutorial shows how how to set up a project in Cinema 4D to get the best results for use with RE:Map UV and RSMB Pro Vectors in After Effects (although you can use other host applications for compositing and some of this will apply to other plugins). A Sample project is included using After Effects.
Special Thanks to Patrick Goski at Maxon.net for creating & providing the C4D sample project and for his support 24/7.This Tutorial Includes
- Video
- ZIP File
-
RE:Map UVW Multipass
See TutorialDescription
Joren Kandel (http://www.thepixellab.net/blog) has provided a Cinema 4D and After Effects tutorial where he shows you how to use RE:Map UV to replace a C4D UV pass with a 2D texture in After Effects.
This Tutorial Includes
- Video
-
RSMB Vectors from C4D to AE
See TutorialDescription
In this tutorial you will learn how to utilise a motion vector pass from Cinema 4D to introduce motion blur in to your final comp, with RE: Vision Effects Reel Smart Motion Blur Vectors Plugin.
If Play link does not work, try this external link
This Tutorial Includes
- Video