Find a Tutorial
 ARRI Film Lab
 Autograph
 Color Genius
 DEFlicker
 RE:Fill
 RE:Grade
 RE:Lens
 REZup
REZup


-
Exporting 3D Renders out of C4D for our plugins: Part 2 - More Passes
See TutorialDescription
This tutorial shows how how to set up a project in Cinema 4D to get the best results for use with RE:Map UV and RSMB Pro Vectors, Smoothkit ZBlur, RE:Fill and Shade Shape in After Effects (although you can use other host applications for compositing and some of this will apply to other plugins).Special Thanks to Patrick Goski at Maxon.net for creating & providing the C4D sample project and for his support 24/7.This tutorial shows how how to set up a project in Cinema 4D to get the best results for use with RE:Map UV and RSMB Pro Vectors, Smoothkit ZBlur, RE:Fill and Shade Shape in After Effects (although you can use other host applications for compositing and some of this will apply to other plugins).
Special Thanks to Patrick Goski at Maxon.net for creating & providing the C4D sample project and for his support 24/7.
This Tutorial Includes
- Video
-
RE:Vision Effects products with Cinema4D
See TutorialDescription
Assigning a Coverage Alpha Matte to the Control Source
Some of our products work from image data rendered from a 3D renderer. Here are notes about Motion Vectors but they apply as well to exporting surface normals or UV maps…
This Tutorial Includes
- Web Pages
-
Introduction to RE:Match Stereo
See TutorialDescription
Description:This tutorial covers the basic concepts and use for RE:Match Stereo
Credits:We would like to thank the following for providing footage:
Jaime Fernández Miranda - jim-box.com.Some material was licensed from Mammoth HD - mammothhd-3d.com/
Thank you to Werner Bloos info@digi-dat.de for providingFootage
OriginalMusic by Bob Bralove, bobbralove.comAlso, thanks to Anthony Magliocco additional footage.
This Tutorial Includes
- Video
-
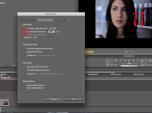
Introduction to RE:Match Color
See TutorialDescription
This tutorial covers the basic concepts and use for RE:Match MulticamCredits:We would like to thank the following for providing footage:Some material was licensed from Mammoth HD - mammothhd-3d.com/The horses are from Trey Ratcliff of stuckincustoms.comAnd also, thanks to Ami Sun for additional footage.Author: Lori FreitagCompany: RE:Vision Effectslink: http://revisionfx.com/products/rematch/This tutorial covers the basic concepts and use for RE:Match Color.
Credits:We would like to thank the following for providing footage:Some material was licensed from Mammoth HD - mammothhd-3d.com/The horses are from Trey Ratcliff of stuckincustoms.com
Also, thanks to Ami Sun for additional footage.
This Tutorial Includes
- Video
-
Exporting 3d renders out of C4D for our plugins : Part 1 - Motion Vectors and UV Maps
See TutorialDescription
This tutorial shows how how to set up a project in Cinema 4D to get the best results for use with RE:Map UV and RSMB Pro Vectors in After Effects (although you can use other host applications for compositing and some of this will apply to other plugins). A Sample project is included using After Effects.Special Thanks to Patrick Goski at Maxon.net for creating & providing the C4D sample project and for his support 24/7.This tutorial shows how how to set up a project in Cinema 4D to get the best results for use with RE:Map UV and RSMB Pro Vectors in After Effects (although you can use other host applications for compositing and some of this will apply to other plugins). A Sample project is included using After Effects.
Special Thanks to Patrick Goski at Maxon.net for creating & providing the C4D sample project and for his support 24/7.This Tutorial Includes
- Video
- ZIP File
-
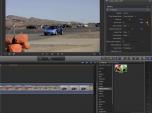
Lip-Synch with Twixtor in Final Cut Pro X- Key framed alignment of video to audio
See TutorialDescription
This tutorial covers the basic concept of timewarping a video track to a different audio track using Twixtor. As example, we lip-synch an outdoor shoot to a studio recording. This method could also be used to sync video to another video trackAuthor: Lori FreitagCompany: RE:Vision Effectslink: http://revisionfx.com/products/twixtor/Additional Credits:A special thank you goes out to Christopher Hawley.(www.ChristopherHawley.net) for letting me shoot footage of you singing/playing "Dance all Day" for this tutorial.This tutorial covers the basic concept of timewarping a video track to a different audio track using Twixtor. As example, we lip-synch an outdoor shoot to a studio recording. This method could also be used to sync video to another video track
Author: Lori FreitagCompany:Additional Credits:A special thank you goes out to Christopher Hawley.(www.ChristopherHawley.net) for letting me shoot footage of you singing/playing "Dance all Day" for this tutorial.
This Tutorial Includes
- Video
-
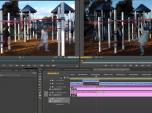
Frame Rate Conversions in Twixtor within Premiere Pro (done in CS5)
See TutorialDescription
This tutorial shows how how to do a Frame rate conversion if the Input and the Output are both Progressive.Special Thanks to Banditos Brothers for providing footage - www.banditobrothers.comAlso, special thanks to Rickard Bengtsson for allowing us to use his water balloon footage www.vimeo.com/rbengtsson.This tutorial shows how how to do a Frame rate conversion if the Input and the Output are both Progressive.
Special Thanks to Banditos Brothers for providing footage. www.banditobrothers.comSpecial Thanks to Rickard Bengtsson for allowing us to use his water balloon footage. www.vimeo.com/rbengtsson.
This Tutorial Includes
- Video
-
Frame Rate Conversions in Twixtor within FCP X
See TutorialDescription
This tutorial shows how how to do a Frame rate conversion if the Input and the Output are both Progressive.Footage provided by Banditos Brothers - www.banditobrothers.comThis tutorial shows how how to do a Frame rate conversion including interlaced and progressive input and output settings. Use this tutorial for Twixtor v5.4 and up.
If you are using versions earlier than Twixtor v5.4, then watch this link: http://www.youtube.com/watch?v=vML1oHCbP-U&list=PL6259C7867889AC48
Footage provided by Banditos Brothers - www.banditobrothers.comThis Tutorial Includes
- Video
-
RE:Map UVW Multipass
See TutorialDescription
Joren Kandel (http://www.thepixellab.net/blog) has provided a Cinema 4D and After Effects tutorial where he shows you how to use RE:Map UV to replace a C4D UV pass with a 2D texture in After Effects.
This Tutorial Includes
- Video
-
Twixtor: SpeedRamp & Fit-to-Fill in FCP X
See TutorialDescription
This screencast gives an overview of how to use Twixtor within Final Cut Pro X, to do a SpeedRamp and Fit-to-Fill. You will see an example of the Frame number and Speed option in Twixtor.
Special Thanks to Mark Tekushan for allowing us to use the sailing footage. www.mfxs.com
Special Thanks to Jesse James Jones for allowing us to use his car footage. www.Jesse.comThis Tutorial Includes
- Video