
Find a Tutorial
 Autograph
 DEFlicker
 RE:Fill
 RE:Grade
 RE:Lens
 REZup
REZup


- Page:
- 1
- |
- 2
-
Using Reel Smart Motion Blur with modo 701 outputs in Nuke & After Effects
See TutorialDescription
the use of motion vectors which modo can output at render time.You can access the sample files including the Nuke and After Effects files here9bstudios.com/modo70x/CrazyChicken.zipA video covering the use of Reel Smart Motion Blur to add motion blur to your images in the post process via the use of motion vectors which modo can output at render time.You can access the sample files including the Nuke and After Effects files here 9bstudios.com/modo70x/CrazyChicken.zip
Special Thanks to Yazan Malkosh 9bstudios.com for providing us with this tutorial. The 3D renderer is Modo luxology.com
This Tutorial Includes
- Video
-
Exporting 3d renders out of C4D for our plugins : Part 1 - Motion Vectors and UV Maps
See TutorialDescription
This tutorial shows how how to set up a project in Cinema 4D to get the best results for use with RE:Map UV and RSMB Pro Vectors in After Effects (although you can use other host applications for compositing and some of this will apply to other plugins). A Sample project is included using After Effects.Special Thanks to Patrick Goski at Maxon.net for creating & providing the C4D sample project and for his support 24/7.This tutorial shows how how to set up a project in Cinema 4D to get the best results for use with RE:Map UV and RSMB Pro Vectors in After Effects (although you can use other host applications for compositing and some of this will apply to other plugins). A Sample project is included using After Effects.
Special Thanks to Patrick Goski at Maxon.net for creating & providing the C4D sample project and for his support 24/7.This Tutorial Includes
- Video
- ZIP File
-
RE:Map UVW Multipass
See TutorialDescription
Joren Kandel (http://www.thepixellab.net/blog) has provided a Cinema 4D and After Effects tutorial where he shows you how to use RE:Map UV to replace a C4D UV pass with a 2D texture in After Effects.
This Tutorial Includes
- Video
-
Better Retiming using a Matte
See TutorialDescription
This Tutorial shows how to get better tracking using a matte to separate your footage into multiple layers. Multiple layers are available in Twixtor Pro for AE, FCP, Premiere Pro, and Twixtor for Smoke, Flame, Fusion, Nuke & OFX hosts such as Scratch & Composite.Author: Lori FreitagCompany: RE:Vision Effectslink: http://revisionfx.com/products/twixtor/This Tutorial shows how to get better tracking using a matte to separate your footage into multiple layers. Multiple layers are available in Twixtor Pro for AE, FCP, Premiere Pro, and Twixtor for Smoke, Flame, Fusion, Nuke & OFX hosts such as Scratch & Composite.
This Tutorial Includes
- Video
-
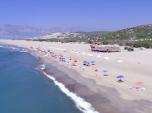
Frame Edge Issues and Twixtor
See TutorialDescription
This Tutorial explains when it is appropriate to use Smart Blend and shows regular Twixtor with Inverse and with Forward Warping and compares a panning shot slowed down 10x with and without Smart Blend
Special Thanks to Mark Tekushan for allowing us to use the beach footage. www.mfxs.com
This Tutorial Includes
- Video
-
Twixtor - Fixing Unwanted Warping
See TutorialDescription
This Tutorial explains how to use Motion Sensitivity to avoid unwanted warping in your re-timed shot.
This Tutorial Includes
- Video
-
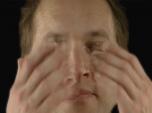
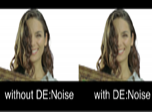
DE:Noise - Beyond the Basics
See TutorialDescription
This tutorial shows how to use DE:Noise. It continues where the "Essentials" tutorial left off. This tutorial covers some of the more advanced settings to remove unwanted noise from your footage and gives examples so you can easily apply them to similar scenarios. The controls are the same in all supported applications except where I note differences.
Special Thanks to (in order of appearance) for providing and/or allowing us to use their footage for this tutorial: (1) Mark Tekushan for the Noisy Blue screen footage www.markfx.com (2) Sean Wheeler & Zander Schloss for allowing us to use the footage I shot of them playing www.facebook.com/SeanWheelerandZanderSchloss (3) Grant Davis www.vjculture.com (4) Jim Tierney for his whale footage www.whalewatcher.net (5) Michael Sayag for his black & white footage (6) AlFredo from BLT in Italy for the Italian Car footage www.blt.itt
This Tutorial Includes
- Video
-
RSMB for Maya users
See TutorialDescription
This is a four-part tutorial about adding motion blur to a Maya render by first creating a 2D motion vector sequence and then using it with ReelSmart Motion Blur in post production. I’ll be covering Maya 2009’s 2D motion vector pass as well as installation and use of the lm_2DMV shader for earlier Maya versions. Once this technique is part of your pipeline, it can be a tremendous time saver compared with creating (and waiting for) motion blur from within Maya. It also provides the flexibility of applying any amount of motion blur without having to re-render.
This Tutorial Includes
- Web Pages
-
RSMB for CInema 4D users
See TutorialDescription
In this tutorial from Motion Works, Grischa Theissen demonstrates a must-know technique for adding motion blur to your 3D renders in After Effects using ReelSmart Motion Blur.
This Tutorial Includes
- Web Pages
-
How to make video look more like film
See TutorialDescription
How do I use RE:Vision Effects plugins to help make video look more like film?
This Tutorial Includes
- Web Pages


- Page:
- 1
- |
- 2