Find a Tutorial
 Autograph
 DEFlicker
 RE:Fill
 RE:Grade
 RE:Lens
 REZup
REZup


-
REZup Overview - Resize & Enhance Product: REZup
See TutorialDescription
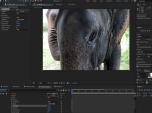
Timestamps:0:14 What is REZup?0:52 REZup Resize Workflow in After Effects.1:07 Example #1 - Scaling HD to UHD using REZup Resize.5:07 Example #2 - OFX Workflow using Autograph.6:56 Example #3 - REZup Enhance in After Effects.Description:In this tutorial, we will see two of our plugins, REZup Resize and Enhance. We see workflow examples in After Effects and in an OFX host, Autograph.REZup Enhance will increase your image quality. See new details that you did not know were available. REZup Resize will allow you to upscale your video without loss of quality.*To see Before/After results in detail please check the gallery https://revisionfx.com/gallery/#rezupTimestamps:
0:14 What is REZup?
0:52 REZup Resize Workflow in After Effects.
1:07 Example #1 - Scaling HD to UHD using REZup Resize.
5:07 Example #2 - OFX Workflow using Autograph.
6:56 Example #3 - REZup Enhance in After Effects.
Description:In this tutorial, we will see two of our plugins, REZup Resize and Enhance. We see workflow examples in After Effects and in an OFX host, Autograph.REZup Enhance will increase your image quality. See new details that you did not know were available. REZup Resize will allow you to upscale your video without loss of quality.
*To see Before/After results in detail please check the gallery https://revisionfx.com/gallery/#rezupThis Tutorial Includes
- Video
-
How to use V-Ray Velocity pass with RSMB
See TutorialDescription
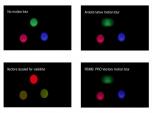
Tutorial describing how to set up V-Ray Velocity pass with RSMB in After Effects and Nuke.
Thank you to Aleksandar Kasabov at Chaos Group for this tutorial.
This Tutorial Includes
- Web Pages
-
Twixtor, Time Remapping and Excel
See TutorialDescription
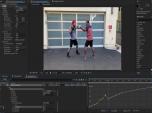
In this tutorial, you will see two different methods used to remap time, as well as a shortcut using an Excel spreadsheet. We also see a frame rate conversion.In this tutorial, you will see two different methods used to remap time, as well as a shortcut using an Excel spreadsheet. We also see a frame rate conversion.This Tutorial Includes
- Video
-
DEFlicker and Timelapse
See TutorialDescription
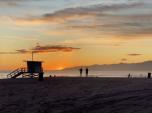
In this tutorial, you will see the workflow used to get rid of Flicker in a Sunset, Time-lapse video shot at a low frame rate with DEFlicker Time-lapse. Download footage here: https://vimeo.com/436250814/34a2feb04e
This Tutorial Includes
- Video
-
How to remove Rolling Bands with DEFlicker
See TutorialDescription
In this tutorial, you will learn the basic steps for using DEFlicker Rolling Bands in After Effects. You will see a few examples demonstrating different scenarios.06:56Effect here is the wagon-wheel effect - see these links tolearn more about wagon wheel effect:https://www.youtube.com/watch?v=VNftf5qLpiAhttps://www.youtube.com/watch?v=QOwzkND_ooUhttps://www.youtube.com/watch?v=6XwgbHjRo30https://www.youtube.com/watch?v=9MN5MF72PHsThank you to Anita Rizzano for the Rolling Bands footage.In this tutorial, you will learn the basic steps for using DEFlicker Rolling Bands in After Effects. You will see a few examples demonstrating different scenarios.
06:56See these links to learn more about wagon wheel effect:
https://www.youtube.com/watchv=VNftf5qLpiAhttps://www.youtube.com/watch?v=QOwzkND_ooU
https://www.youtube.com/watch?v=6XwgbHjRo30
https://www.youtube.com/watch?v=9MN5MF72PHs
Thank you to Anita Rizzano for the Rolling Bands footage.
This Tutorial Includes
- Video
-
Unwrapping iZugar MKX200 3.8mm fisheye with RE:Lens
See TutorialDescription
RE:Lens tutorial using Izugar 200 mm fisheye - MKX200 is very distortion free
https://www.izugar.com/shop/product/mkx200/Compatible with ZCAM E2, and can also be used on Sony E-Mount and Nikon Z mounts with adapter ringsThis Tutorial Includes
- Video
-
MV out of Maya with Arnold
See TutorialDescription
Maya now ships with Arnold as renderer. This tutorial reviews the motion vector shader they made to support our products.
This Tutorial Includes
- Web Pages
-
How to make a perfect stabilization VR 360 Hyperlapse video
See TutorialDescription
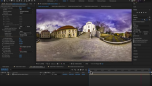
Andrii Shramko demos a useful feature in RE:Lens spherical stabilizer allowing you to handle real hard shots by masking areas of the source. You can also use this feature on fisheye stabilization where there is moving junk (light flares and leaks) outside of the image circle that affects the tracking, as well as in stitched videos where a camera is moving indepedently from the rest of the rig (which confuses any tracker).
https://www.facebook.com/shramko360/This Tutorial Includes
- Video
-
RE:Lens - Stabilizing 360 VR footage
See TutorialDescription
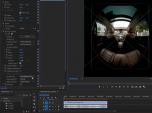
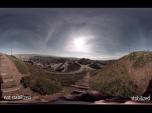
In this tutorial, you will learn the basics of how to use the "Spherical Stabilization" feature within RE:Lens Superfish, ToLatLong and FromLatLong.In this tutorial, you will learn the basics of how to use the "Spherical Stabilization" feature within RE:Lens Superfish, ToLatLong and FromLatLong.
This Tutorial Includes
- Video
-
Tracking, Fisheye lenses and RE:Lens
See TutorialDescription
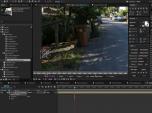
Description:In this tutorial, you will see a workflow example of tracking a flat graphic to footage that was shot using a Full Frame Fisheye Lens. Lens used: Panasonic Lumix 8mm fisheye on GH4 Full Frame Fisheye and RE:Lens DEFishAuthor: Lori FreitagCompany: RE:Vision Effectslink: http://revisionfx.com/products/RELens/Description:In this tutorial, you will see a workflow example of tracking a flat graphic to footage that was shot using a Full Frame Fisheye Lens. Lens used: Panasonic Lumix 8mm fisheye on GH4 Full Frame Fisheye and RE:Lens DEFish
This Tutorial Includes
- Video